.png)

HOW DO SET IMAGEVIEW IMAGE SET US WALLPAPERS
Imageview image setus wallpapers
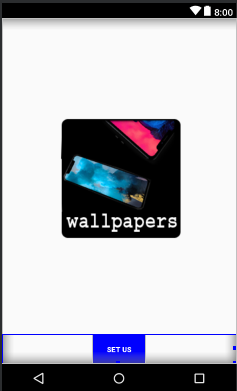
prview:
Lets make up:
setp 1:
creating projects in android studio or sketchware
step2:
open activity_main.xml
Main_xml:

MainActivty:
package nwallpapers.com.neo.istone.andro.project.wallpapers.nwallpapers;
import android.app.Activity;
import android.app.AlertDialog;
import android.app.ProgressDialog;
import android.app.WallpaperManager;
import android.graphics.Bitmap;
import android.graphics.drawable.BitmapDrawable;
import android.media.Image;
import android.os.Bundle;
import android.view.View;
import android.widget.Button;
import android.widget.ImageView;
import java.io.IOException;
import java.util.Timer;
import java.util.TimerTask;
public class MaiActivity extends Activity {
private Bitmap bitmap;
private Timer timer = new Timer();
private TimerTask _timer;
private ImageView images;
private Button set_us;
@Override
protected void onCreate(Bundle savedInstanceState) {
super.onCreate( savedInstanceState );
setContentView( R.layout.activity_main );
images = (ImageView) findViewById(R.id.iview);
set_us = (Button) findViewById(R.id.set);
set_us.setOnClickListener(new View.OnClickListener() {
@Override
public void onClick(View v) {
setWallpapers();
}
});
}
private void setWallpapers() {
bitmap = ((BitmapDrawable)images.getDrawable()).getBitmap();
final WallpaperManager myWallManager = WallpaperManager.getInstance( getApplicationContext() );
try {
final ProgressDialog progressDialog = new ProgressDialog(emple.this);
progressDialog.setMax(100);
progressDialog.setMessage("Loading...");
progressDialog.setIndeterminate(true);
progressDialog.setCanceledOnTouchOutside(false);
progressDialog.show();
_timer = new TimerTask() {
@Override
public void run() {
runOnUiThread( new Runnable() {
@Override
public void run() {
try {
myWallManager.setBitmap(bitmap );
progressDialog.dismiss();
final AlertDialog.Builder setus = new AlertDialog.Builder(emple.this);
setus.setMessage(R.string.set_wallpapers_secufully);
setus.show();
progressDialog.dismiss();
} catch (IOException e) {
final AlertDialog.Builder setus = new AlertDialog.Builder(emple.this);
setus.setTitle(R.string.set_wallpapers_error);
setus.setMessage(e.toString());
setus.show();
progressDialog.dismiss();
}
}
} );
}
};
timer.schedule( _timer, (3500) );
} catch (Exception e) {
final AlertDialog.Builder setus = new AlertDialog.Builder(emple.this);
setus.setTitle(R.string.set_wallpapers_error);
setus.setMessage(R.string.set_wallpapers_error);
setus.show();
}
}
}


0 Comments: